Adding a drop shadow to your digital scrapbook elements gives them dimension and helps to make them look more ‘real’. In this digital scrapbooking tutorial you will learn how to customize your drop shadows to make them look more realistic.
When you select a drop shadow from the Layer Styles Pallet you can choose from a range of options. But each of these shadow styles comes with default settings which determine how dark the shadow is, how large it is and how far away from your element it extends. And all the defaults come in grey.
In real life shadows are not usually grey. The tend to take their color from the surface on which they are cast. You can test this yourself by placing an object over a colored surface and looking closely at the shadow. Typically you will see that it’s a dark shade of the surface and not a black/grey color (unless that’s the color of the surface).
So if you want your shadows to look more like real life you will have to modify the defaults in your photo editing program.
This digital scrapbooking tutorial refers to Photoshop Elements but you can easily translate it to suit most good photo editing software programs.
First activate your element layer in the Layers Pallet and then select a shadow from your Styles Pallet and click to apply it to your element.
Now double click on the little ‘sun’ or circle’ icon at the right of its layer in the Layers Pallet.
You are presented with a Style Settings dialog box that allows you to play with the size of the shadow, the distance it sits away from your element and it’s opacity. You can vary these parameters by using the slider bars or by typing pixel sizes directly into the appropriate fields in the dialog box.
You can also customize the colors of your shadows to reflect the color of your background or even to create a funky effect. To customize the color of your shadow do this (note: this feature is not available in PSE4).
Click on the small color swatch box to the right of the size parameter in your Style Settings box.
The color picker box will open and you can move your mouse over your layout (it will turn into an eyedropper) and click on an area of your background which is the colour you want for your shadow.
You can click in the Color Picker to choose variations on this if you like. Usually you will choose a darker variation of the color. And when you’re satisfied, click OK.
By playing with the Opacity slider in the Style Settings box you can make the shadow look lighter or heavier.
When you have the shadow look you want click OK.
And that’s all there is to it.
Once you start customizing your drop shadow you’ll never settle for those default grey ones again.
I hope you’ve found this tutorial useful. Whilst your here why not check out some of the other digital scrapbooking tutorials we have available.
Ever wondered how to cut a subject out of a photo and then put it on a different background?
Well this digital scrapbooking tutorial shows you one of the many ways in which you can do that. I say ‘one of the many ways’ because in the Photoshop and Photoshop Elements world there are usually several different ways in which you can achieve a similar outcome. Some techniques work better in certain instances than others. And some techniques are ones that you just plain prefer to use rather than others. It all depends on your individual preferences.
Anyway this is a demonstration of extracting a subject from a photo using the Polygonal Lasso Tool.
I love the way he’s changed the whole context of the photo by layering his extracted subject onto such a totally different background.
Here’s a Digital Scrapbooking Tutorial which shows you one of the ways you can change the color of your digital paper if it doesn’t quite suit your scrapbook layout.
This is one of the great advantages of digital scrapbooking over traditional paper scrapbooking. You’re never lost for the right color paper because you can change the color of any of the papers in your stash and make it coordinate which the scrapbook layout you’re designing.
There are several different techniques for changing the color of digital scrapbook elements and this digital scrapbooking tutorial demonstrates one of them. Other techniques may be used for different circumstances.
This digital scrapbooking tutorial is made using Photoshop. If you use a different software program you may find the names of the tools and their locations will be different. But the overall principles and techniques are still the same.
This digital scrapbooking tutorial is about recycling your favourite digital scrapbook layouts and turning them into digital scrapbook templates.
You can then clip different elements to the template layers and create a totally different scrapbook layout. Not only that but you can rotate the template or even some of the layers to give even more different scrapbook layout designs.
Making your own digital scrapbook template from an existing digital scrapbook layout is quite easy. Just follow these steps.
Create a Template from your Scrapbook Layouts
Choose your scrapbook layout in its layered format. It’s best to choose one with strong structural elements to the design.
Duplicate the file so you don’t accidentally destroy your original layout
Delete any layout specific layers like journaling and any embellishment layers that don’t contribute to the overall structure of the layout.
Now Control+Click on one of the layer icons in your layers pallet to select all the pixels on that layer.
Set your color swatch to a shade of grey (just because that’s the usual color for templates) and with your bucket tool, click on the selected element to turn it a solid grey color.
Repeat the previous two steps for each element layer, varying the shade of grey so that you can easily distinguish between the layers.
You now have a digital scrapbook layout template which you can vary to create very different looking layouts.
Try rotating the file so that you can see how the design looks from other angles. And don’t be afraid to discard any of the shapes if they don’t fit what you want to do with your new scrapbook layout.
You can also try rotating individual element layers for a different look.
I hope you’ve found this digital scrapbooking tutorialuseful and that you’ll try out this yourself. You’ll be amazed how different the same digital scrapbook template can look when you apply different papers to it.
There are lots of different ways in which you can create a featured area on your photo to draw they eye to your focal subject in your scrapbook layout.
This digital scrapbook tutorial shows you a simple but very effective technique you can use. It gives a funky embossed effect to your focal area whilst still keeping the context of the rest of the photo.
It’s a good idea to consider using focal highlighting techniques when you have a lot of busy background in the photo. Another simple technique is to put a frame around your main subject; just laying it down on top of the photos at an angle to give a more casual look.
But here’s a way you can do something a little bit different.
This digital scrapbooking tutorialuses Photoshop Elements and if you use a different software program you may find the names of the tools and their locations will be different. But the overall principles and techniques are still the same.
This digital scrapbooking tutorial is all about making Word Art.
Word Art is super handy for instant titles for digital scrapbook layouts and greeting cards. And it can also be used as journaling.
Most of us are familiar with the Word Art in programs such as Word. But that can be quite limiting and doesn’t really do the job.
Many digital scrapbook designers have created Word Art as part of their digital scrapbooking kits but finding some that has the right words for your particular scrapbook layout or card can sometimes be difficult.
So why not make your own Word Art?
In this digital scrapbooking tutorial you will see how easy it can be to create interesting and unique word designs that make wonderful greeting cards or titles for your digital scrapbook layouts.
Even if you’re not a digital scrapbooker you can create your own Word Art and print it out to use on your paper scrapbook layouts or cards.
So here’s your chance to be a Designer. It’s a lot of fun and you’ll get a big kick out of the comments that people make when they see what you’ve done.
So why not give it a go?
This digital scrapbooking tutorialuses Photoshop Elements and if you use a different software program you may find the names of the tools and their locations will be different. But the overall principles and techniques are still the same.
In this video Digital Scrapbooking Tutorials introduces you to the Wacom Bamboo graphics tablet. Graphics tablets are a wonderful way to digitally scrapbook, once you’ve mastered the initial learning curve.
Graphics tablets help you get better control for detailed work than you can achieve with your mouse. I’m hoping to find more digital scrapbooking tutorialson graphics tablets to bring you in the near future.
Not all Photoshop Elements tutorials are digital scrapbooking tutorials but you can pick up some great digital scrapbooking techniques from tutorials videos like this.
Here Bill Myers shows you how you can use the Magic Extractor Tool to copy parts out of one image and paste them into another.
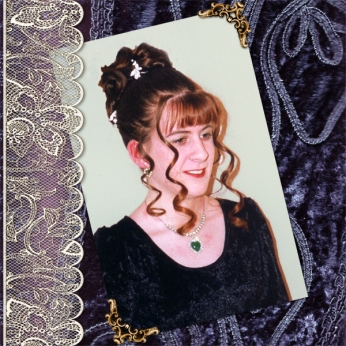
Not all digital scrapbooking tutorials need to be about techniques for your graphics editing software. Your Scanner can be a wonderful tool for creating digital scrapbooking elements.
An easy way to create your own backgrounds is to scan items of fabric and use them as backgrounds. You can use items of clothes too and don’t worry about seams or pocket showing. They all add to the interest of your background.
Make sure you scan your item scan at the highest resolution that you can. Then using your photo editing or drawing software, open a new file with a transparent background in the size of your layout. A resolution of 300dpi is the best size for a good quality print.
Drag your scanned image onto the new file. You can then move it around to find the best section of your scanned image that fits into your background layer. You can Shift-drag on the corner of the image to reduce the size if necessary but don’t worry if parts hang off the edge of the background layer.
Once you’ve positioned the image as you like it, crop it to the size of the background layer and build your layout.
The background in the example above is a scan of the velvet dress my daughter is wearing in the photo. In other digital scrapbooking tutorials you will see how to apply different effects to your scanned image to enhance it even further.
In this digital scrapbooking tutorial you’ll learn how you can create your own digital templates out of your favorite digital layouts which you can share with others or use again yourself with different papers and elements.
Once you use your template with different kits you’ll be amazed at how different your scrapbook layout design looks. I think this is a really cool idea and I hope you’ve enjoyed this digital scrapbooking tutorial.