h1

Digital Scrapbooking Tutorials – Retinting your photos

May 7, 2010

In this digital scrapbooking tutorial you can learn how to change the color of your photos.

All our photos, particularly so with digital ones, tend to be in color. And usually that’s a good thing. But sometimes you want a vintage look for your scrapbook layout or the colors in your photo clash with the digital scrapbook elements that you want to use. Especially where there are lots of different colors in the photo, all vying for attention.

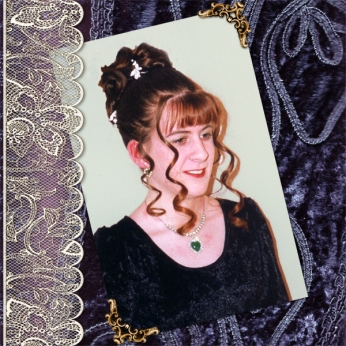
Well check out this digital scrapbooking tutorial which shows you how you can manipulate the color of your photo so that it matches your layout.
I reckon this is one of the best things about digital scrapbooking.It’s so easy to make your photos and digital elements coordinate well with each other.

In this digital scrapbooking tutorial you can see a couple of different approaches to how you can change the color of your photos so that they better suit the particular style of the scrapbook layout that you want to create.

This digital scrapbooking tutorial video is made using Photoshop Elements. If you use a different software program the names of the tools and their location may be different but the principles will be the same.

h1

Digital Scrapbooking Tutorials for Newbies

May 7, 2008

At last there’s a program that delivers digital scrapbooking tutorials for absolute beginners to digital scrapbooking!

So many of the tutorials that abound on the Internet assume a level of skill and understanding of terminology that can be totally off-putting to the newbie digital scrapbooker

Whether it’s someone who is already a paper scrapbooker and wants to give digital scrapbooking a try, but is a bit uncomfortable about how they’ll deal with the technology. Or whether it’s someone who has never done any scrapbooking before but wants to create something special with their photos, with no mess, no fuss and no special workspace needed.

As a digital scrapbooker myself, who’s evolved from paper scrapbooking, I can speak from personal experience on how great digital scrapbooking is.

Unlike paper scrapbooking, I can’t ruin my supplies by making a wrong cut or by glueing something in the wrong place. The wonderful Undo button means that nothing is irreversible.

And that’s an amazingly freeing concept.

Because of that wonderful Undo button, I’m prepared to be a lot more experimental than with my paper layouts. And the result is that I’ve become a much more creative scrapbooker than I ever was.

I feel like I’m creating pieces of art with my photos as the centrepiece.

It’s a hugely satisfying feeling.

And it’s great that there’s a web site now that will mentor newbies along their digital scrapbooking journey.

It’s about time there was a digital scrapbooking tutorial program like this.

h1

Digital Scrapbooking Tutorials – Customising your Background Mat

December 17, 2007

Many digital scrapbooking tutorials that are designed for Photoshop will work equally as well with Photoshop Elements. And this is just such a one.

This video shows you how to change the colors on your backgound and frame elements to coordinate with you layout. And then add some texture for dimension.


I hope you enjoyed this digital scrapbooking tutorial. I love how many terrific digital scrapbooking tutorials are available to help you create wonderful layouts.

h1

Digital Scrapbooking Tutorials – Wacom tablet

December 15, 2007

In this video Digital Scrapbooking Tutorials introduces you to the Wacom Bamboo graphics tablet. Graphics tablets are a wonderful way to digitally scrapbook, once you’ve mastered the initial learning curve.


Graphics tablets help you get better control for detailed work than you can achieve with your mouse. I’m hoping to find more digital scrapbooking tutorials on graphics tablets to bring you in the near future.

h1

Digital Scrapbooking Tutorials – Using the Cookie Cutter in Photoshop Elements

December 14, 2007

There are some great digitals scrapbooking tutorials around for Photoshop Elements. I really liked this one on how to use the cookie cutter tool.

It makes cropping your photos into different shapes a breeze.


Whenever I watch one of these digital scrapbooking tutorials I always manage to find something I didn’t know before.

h1

Digital Scrapbooking Tutorials – The Magic Extractor Tool

December 13, 2007

Not all Photoshop Elements tutorials are digital scrapbooking tutorials but you can pick up some great digital scrapbooking techniques from tutorials videos like this.

Here Bill Myers shows you how you can use the Magic Extractor Tool to copy parts out of one image and paste them into another.


I hope you enjoy these digital scrapbooking tutorials as much as I’m enjoying finding them for you.

h1

Digital Scrapbooking Tutorials – Picking Colors in Picasa

December 12, 2007

This is one of those digital scrapbooking tutorials that is universally useful no matter what graphics editing program you use. Picasa as a wonderful free tool from Google that helps you manage all your images. Just Google Picasa to find and download it if you haven’t already got it. I use is all the time for finding kits and elements in my ever growing digital scrapbooking stash.

This video shows you another great use for it. How to find elements of a particulars color that may be scattered throughout your stash. This has the potential to be an enormous time saver for all digital scrapbookers.


It’s digital scrapbooking tutorials like these that make digital scrapbooking such a wonderful hobby.

h1

Digital Scrapbooking Tutorials – Scan your backgrounds

December 11, 2007

Not all digital scrapbooking tutorials need to be about techniques for your graphics editing software. Your Scanner can be a wonderful tool for creating digital scrapbooking elements.

An easy way to create your own backgrounds is to scan items of fabric and use them as backgrounds. You can use items of clothes too and don’t worry about seams or pocket showing. They all add to the interest of your background.

Make sure you scan your item scan at the highest resolution that you can. Then using your photo editing or drawing software, open a new file with a transparent background in the size of your layout. A resolution of 300dpi is the best size for a good quality print.

Drag your scanned image onto the new file. You can then move it around to find the best section of your scanned image that fits into your background layer. You can Shift-drag on the corner of the image to reduce the size if necessary but don’t worry if parts hang off the edge of the background layer.

Once you’ve positioned the image as you like it, crop it to the size of the background layer and build your layout.

seona-formal.jpg

The background in the example above is a scan of the velvet dress my daughter is wearing in the photo. In other digital scrapbooking tutorials you will see how to apply different effects to your scanned image to enhance it even further.

h1

Digital Scrapbooking Tutorials – Make your own digital templates

December 10, 2007

In this digital scrapbooking tutorial you’ll learn how you can create your own digital templates out of your favorite digital layouts which you can share with others or use again yourself with different papers and elements.


Once you use your template with different kits you’ll be amazed at how different your scrapbook layout design looks. I think this is a really cool idea and I hope you’ve enjoyed this digital scrapbooking tutorial.

h1

Digital Scrapbooking Tutorials – Make your own rub ons

December 8, 2007

Here’s a knacky little digital scrapbooking tutorial from Ro Paxman of Scrap Girls. This enables you to use your digital skills to create rub-ons for your traditional scrapbook layouts. A particularly handy thing for hybrid Scrapbookers who like to mix and match their digital and paper skills to create hybrid layouts.

Okay, all of you paper scrapbookers or bi-scrapbookers, did you know that you can use even the most detailed digital embellishments for paper scrapbooking? No kidding. And you don’t have to cut out a single thing.
How?
By making your own rub-ons with them.

Here’s how:
1. Get an ink-jet transparency.
2. Select your digital embellishment (check out how cool the stitches are in the sample below) and insert the graphic into a Word document or other word processing document.
3. Print on the slick side (yes, that is the WRONG side) of the transparency.
4. Place the transparency on your paper ink-side down and rub the back with a tool of some kind until all of the ink transfers to the paper. (My current favorite paper scrapbooking tools are those little wooden cuticle pusher sticks. They have a pointed end on one side and a flat end on the other. The flat side is perfect for things like this.)

sg_examples_of_digital_embellishments_transparency_rubons.jpg

Note: You have to make yourself go STRAIGHT down when you place the transparency and don’t let yourself slide it around. The two stamps samples show what happens if you slide. I slipped on the right-hand one, but went straight down on the left one.

If you have recently been perusing rub-on prices, you will realize immediately that you can save some real money with this idea. And guess what? You won’t run out of these. Want to have stitches on every single layout and card you ever make for the rest of your life?
No problem. Just print and rub away!

P.S. Having trouble with your printer and a transparency. Try an 8.5×11 page protector. It works, too!

Tutorial written by Rozanne Paxman (CEO Scrap Girls)

Although not strictly speaking a digital scrapbooking tutorial, this is a useful technique for all scrapbookers.